From Digital to analog, to easy money
As an update to my previous post, here’s another spotted totally useless chinese product: An HDMI to YUV converter. Of course, there’s no DSP, it’s just raw signal reassignement…
Supposely only used by a ‘special’ appliance. But customers can’t be aware of this.

Buffalo WZR-HP-G300NH additional packages environment setup (ddwrt)

Assuming you’ve properly configured and initialized your jffs filesystem on your Buffalo WZR-HP-G300NH running the DD-WRT firmware, here’s the instructions to set-up the root filesystem (it needs its own, as the main root is not writable) and its package manager.
Creating root and installing the package manager
Download a compatible rootfs and install it in /jffs
cd /jffs

wget http://downloads.openwrt.org/snapshots/trunk/ar71xx/openwrt-ar71xx-generic-rootfs.tar.gz -O - | tar -zxf -
Download the opkg package manager which allows reconfiguring paths
wget "http://downloads.openwrt.org/snapshots/trunk/ar71xx/packages/opkg_*.ipk"

ipkg -d /jffs/ install opkg_*.ipk
Alternative 1 – relocated
Create your opkg configuration (using echo to allow copy/paste without switching to vi)
echo "src/gz snapshots http://downloads.openwrt.org/snapshots/trunk/ar71xx/packages/" > /jffs/etc/opkg_relocated.conf

echo "dest root /jffs" >> /jffs/etc/opkg_relocated.conf

echo "dest ram /tmp"  >> /jffs/etc/opkg_relocated.conf

echo "lists_dir ext /jffs/var/opkg-lists" >> /jffs/etc/opkg_relocated.conf
You now have a second root installed in /jffs with its package manager, but we need to fix runtime binaries and libraries paths.
Create the setup script in your jffs root:
echo "export LD_LIBRARY_PATH=/jffs/lib:/jffs/usr/lib:/lib/:/usr/lib" > /jffs/setup.relocated

echo "export PATH=/jffs/bin:/jffs/sbin:/jffs/usr/sbin:/jffs/usr/bin:/bin:/sbin" >> /jffs/setup.relocated

echo "alias opkg='opkg -f /jffs/etc/opkg_relocated.conf'" >> /jffs/setup.relocated

chmod +x /jffs/setup.relocated
Initialize your environment when you need to use it
. /jffs/setup.relocated
Alternative 2 – chroot’ed
Here’s a better alternative relying on chroot, but needs to have completed alternative 1’s steps first. (or you won’t be able to install chroot)
Install chroot
opkg install chroot
Create the setup script for this configuration
echo "BIND_DONE=\`mount | grep /jffs/proc\`" > /jffs/setup.chroot

echo "if [ -z \"\$BIND_DONE\" ]; then for fs in dev sys mnt proc ; do mount --bind /\$fs /jffs/\$fs ; mount --bind /tmp/var /jffs/tmp/ ; done ; fi" >> /jffs/setup.chroot

echo "mkdir /var/lock" >> /jffs/setup.chroot

echo "/jffs/usr/sbin/chroot /jffs" >> /jffs/setup.chroot

chmod +x /jffs/setup.chroot
Create a regular opkg configuration to make it work inside chroot
echo "src/gz snapshots http://downloads.openwrt.org/snapshots/trunk/ar71xx/packages/" > /jffs/etc/opkg.conf

echo "dest root /" >> /jffs/etc/opkg.conf

echo "dest ram /tmp"  >> /jffs/etc/opkg.conf

echo "lists_dir ext /var/opkg-lists" >> /jffs/etc/opkg.conf

rm /jffs/etc/opkg/xwrt.conf ; ln -s /etc/opkg.conf /jffs/etc/opkg/xwrt.conf

cp /etc/resolv.conf /jffs/etc/resolv.conf
Initialize your environment when you need to use it
. /jffs/setup.chroot
Finally
don’t forget to fetch the packages list:
opkg update
You can now install any package you want.
The RS232 money changer
Ran into strange cable adapters on ebay.
Here’s a nice Male-Female RS232 adapter that will only change the money you spent for this stuff into a loss.

If you don’t see the problem, just think of what results when plugging this adapter to a cable: Plugging it to a male plug, ends with a male plug. Plugging it to a female plug ends with a female. From description, it’s even not a cross (null-modem) converter. It changes absolutely nothing and only Male/Male and Female/Female adapters makes sense. Someone suggested me that junk could be used 5mm RS232 port riser 🙂
Here’s another suspicious one: USB 2.0 to mini Firewire.
Different protocols, different voltages… you could just end up burning your device. Anyway, there could be a mini protocol converter chip hidden in one plug, so this one needs more investigation.
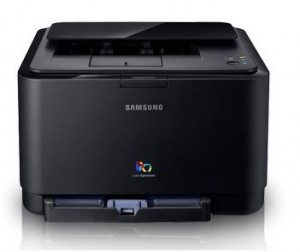
Freeing the CLP-315 without modchip
Samsung’s CLP-315 (and CLP-310) are the smallest and cheapest laser color printers around. They just suffer one problem: Samsung protected it against generic toners and its expensive original consumables totally counter-balance the hardware low price. As each page is counted in both toner and printer, refills are also not possible. Printing 1000 white pages will require a new toner: unacceptable and definitively not a ‘green’ product (see Planned Obsolescence). Modifying your printer will allow you to extend your consumables life, or, if you want to risk your health and printer hardware, refill them.
Current chip market
Many chips can be found, with or without refill kits, on ebay. Prices range from $20 to 49$.
Seems Samsung changed the gameplay by updating and reinforcing the mainboards, as some chips states working only on units prior to July 2009. Some claim disabling the CLP-315W wifi.
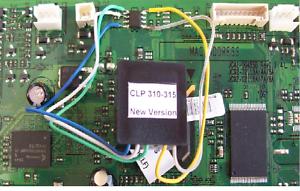
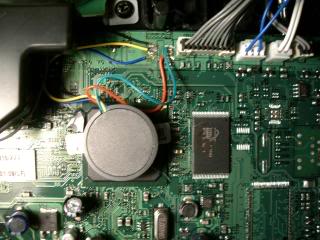
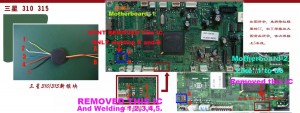
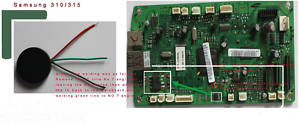
By looking at installation pictures, seems that they all target the same IC, using 3 to 7 wires.
5 wires chip from Turkey
Some 5 wire chip from china. Note that an IC is removed.
Another version with 7 wires from china. IC removed.
And one 3 wires chip. No IC removal.
Lots of different modchips, and lots of behaviours… but we can guess from them:
- The IC is the key
- Removing the IC breaks WiFi
- Toners chips contacts needs to be taped or removed.
About the protection
The CLP-300 (previous model) was using cylindrical toner cartridges including chips. Replacement chips can be found and some people managed to directly erase/rewrite the counters on those.
The CLP-310/315 now includes an internal counter to avoid reprogrammed old toners. The printer stores counts in both toner and IC (the target of the modchips).
Some google results also states that the first toners have no chip counter (where 4×3 pins contacts from the printer toner door connects to), and those ones can’t be refilled with the 3 wire chips once they are depleted. The printer starts verifying the toners after the first 1000 pages. If there’s no need of tweaking toners on new printers, can the printer IC be reset ? I did not found much resources about this, except one spanish blog linking to a no longer available russian page and czech forum. What could be understood (less than a little), is that it seems possible to achieve bocking the counter by just unsoldering one and joining two pins of the IC.
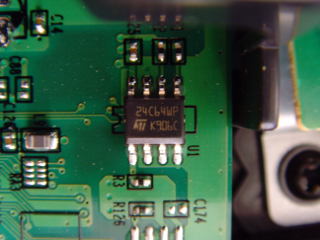
The mainboard IC being a flash 24C64WP from ST Microelectronics. The linked pins are WC and Vcc. By looking at the datasheet, the WP pin appears being a ‘Write Protect’ function for the IC. This now makes sense ! Pages counter is blocked just by enabling the internal write protection: Driving it high by connecting it to Vcc. Let’s give it a try !
The mod
This modchipless modification is for new or less than 1000 pages units.
I auctioned a CLP-315 printer for $90. Printing the configuration shown that pages were 2 black and 0 colors pages counted.
Don’t complain this broke your printer: you’ll loose your printer warranty and this modification is at your own risk ! If you never soldered, if you don’t have the right tools and if you don’t know about static charges: don’t do it.
Disassembling procedure can be found for this model:
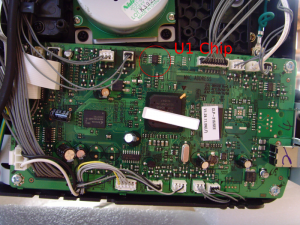
You should end up with an exposed mainboard. The IC chip being labeled ‘U1’.
Remember how you have extracted the right cover from the front door. This is the most difficult step is reassembly !
The chip is effectively a 24C64WP, but it is on a different location.
The mainboard could be removed, but this is a risky step as many wires are connected to it. The plugs can break easily by pulling them. If you don’t have the tool to remove them (each plug have a 0.3mm plastic handle on each side), soldering will be uncomfortable, but possible. I personally chosen to rotate the printer and face up mainboard, at the risk of loosing some toner powder.
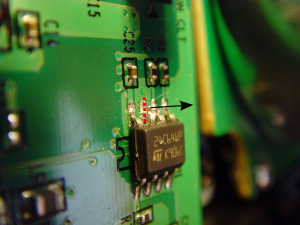
Identify the chip (U1 on mainboard) and unsolder the pin 7 (counted counter clockwise, IC mainboard mark on left). Mine was near CMS C25. This could be quite difficult, so here’s a tip: Start removing some welding (using pump) and then create a “lasso” with some kynar wire. Pulling the lasso horizontally while heating the pin should raise it a bit. A needle will help once freed from mainboard contacts. As the grounded pin on the mainboard would create a short-circuit after being connected to Vcc, so carefully check it is not touching.
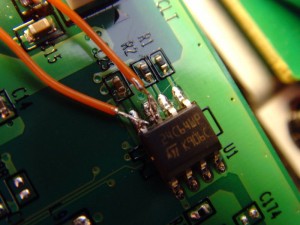
Apply some solder on the two pins and solder the wire, joining them: that’s all.
You should end up with something cleaner than this… or this would mean you shook as much as me 🙂
Check connections with a multimeter and reassemble unit.
Printing some pages and checking counter (Hold down power button for 5 seconds) showed a still increasing counter. Powering the unit it off for few seconds resets the state to the previous one. The counters are blocked !
About commercial modchips
So what are doing the modchips ? Here’s my guess:
- The 3-Wire one is just write-protecting. This is the same as doing the previous modification.
- The 5 wires or 7 wires chips, requiring original IC removal, are replacement ICs. They contain a copy of the counters and configuration of a new unit. Once soldered they act like a new unit write protected IC. This is why it warns that CLP315W users won’t be able to use WiFi: The mac address isn’t the device’s one and/or WiFi keys/configuration can’t be saved.
- The 5 wires one is more interesting. As the original one has no pins unsoldered, I think this one acts as a IC partial reprogrammer when the printer is idle, and/or invalidates some addresses. This is why this kind of modchip works for any printer and still let the user to use and save his wifi configuration.
Then do you need a chip ?
- If you printer is new or under 1000 pages: No. Just write protect the flash.
- If you reached 1000 pages: You’ll need one as you printer will require query toner chips. Another solution would be to rewrite the IC and tape toners chips contacts: this need to be confirmed.
Note that if your counters are showing 997 pages, Write protecting will only allow you to print 3 pages before you’ll need to power cycle printer.
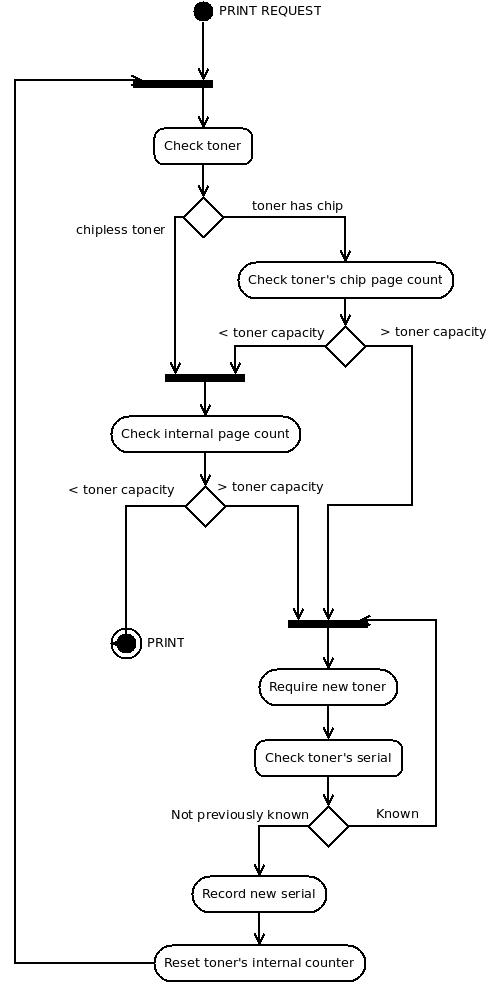
Here’s a diagram of the page count check process: (based on my assumptions)
Import branch onto shallow git clone
Cloning a git repository can be bandwidth consuming and really heavy task when resolving deltas.
Shallow clones offers alternative by retrieving only partial history from a repository. This will download less objects and require less computing time.
If you only want current version:
git clone --depth=1 repository
But shallow clones have many limitations as stated: “you cannot clone or fetch from it, nor push from nor into it” (see Git Clone)
However, you could still import a forked repository into a local branch if the fork point is common to the two trees.
git add remote forkedrepository git://thefork
git fetch forkedrepository remote:newlocalbranch
At this time, if you get an “error. connection reset by peer” then your local repository doesn’t contain enough refs.
If keeping as-is your current shallow clone content isn’t mandatory, you could easily rebuild it. Start cloning the forked repository, and let it run until he finished counting number of “objects”.(*)
git clone git://thefork tempdir
Then just use the object number value as depth. This value can’t be larger than number of commits 🙂
git clone --depth=<number of objects> repository
(*) There might be an easier way to count without starting a clone process, but since it’s ran on remote server, I have no idea on how to trigger it.

